Wednesday, 30 March 2011

Rocky Road Cupcakes

Hello everyone!

This week has been full of baking and caking, so there are many exciting recipes and photos waiting to be written about! I recently found a wonderful book at Åhléns in Jönköping that was all about Cupcakes, cookies and cheesecakes. It is so full of fun and inspiring ideas that I can't wait to try out!


The first recipe that I tried was their Rocky Roads Cupcakes. Like usual, I hardly ever follow a recipe exactly as it stands, I'm always finding ways to put my own touch on something. But even so, I seriously LOVE cookbooks...I could sit for hours just looking and being inspired!

Here's the recipe my way: (to see this recipe in Swedish click here!)

Rocky Road Cupcakes, makes about 12


125g butter or margarine, room temperature
½ tsp vanilla essence
1½ dl sugar (150ml)
2 eggs
2½ dl flour (1 cup)
1½ tsp baking powder
¾ dl milk (75ml)
1 tbsp cocoa
2 tbsp extra milk

Rocky road topping:

500g milk chocolate, melted
50g pistachio nuts
50g cashew nuts
50g mini marshmallows

Here's how:
1. Preheat the oven to 180 degrees C. Line a muffin tray with paper liners.

2. Beat the butter, vanilla and sugar for about 5 minutes. Mix in one egg at a time. Beat for a few more minutes until light and fluffy.

3. Mix in the flour, baking powder and milk.

4. Divide the batter into 2 bowls. Mix the cocoa and the 2 tbsp milk and add to one of the batters.

5. Put a lillte of each batter into the cupcake liners. Stir around gently with a toothpick to get a marbled effect.

6. Bake in the middle of the oven for 20 minutes. Let cool completely.

7. Mix all the ingredients for the Rocky Roads in a bowl. Top each cupcake with a spoonful. Drizzle a little bit of dark chocolate over the top.

Happy baking!

Love,
Heidi

Monday, 21 March 2011

Hello Kitty!


Hello everyone!

Wow, what a busy 2 weeks it has been! Life has been a rollercoaster of fun and exciting events!

This week-end we had time to go to a sweet little girl's 4th birthday party! It was a Hello Kitty party, so for the first time ever, I made a Hello Kitty cake. It was really cute!


Lately I've been trying out some new tricks for my cakes. Nothing really beats the look of a cake covered in fondant, but at the same time it's really sweet and not always nice to eat too much of...especially here in Sweden. So instead of covering a whole cake in fondant, I have been covering it with delicious cream cheese frostings instead!!! Even though there is definately a time and a place for fondant covered cakes, I'm learning that sometimes it can be just as nice with a good frosting and some sweet fondant decorations.

For this Hello Kitty cake I made some of the decorations with marsipan and some with fondant. It was perfectly cute for a little girl!


For the base of the cake I wanted to try a new recipe, so I took one from Manuela's blog (Passion for baking). While I was there I found a great white chocolate and cream cheese frosting recipe which I gave a try, with a few little changes here and there...and OH MY WORD...it's my new favourite icing/frosting recipe!!!


Here they are:

Chocolate base: (Can also be found here)


200 g butter or margarine, romms temperature
3 dl sugar (300ml)
1 tsp vanilla essence/sugar
3 eggs
1,5 dl cocoa (150 ml)
5 dl flour (2 cups)
1/2 tsp baking powder
1 1/2 tsp bicarbonate
1 tsp salt
3 dl water

1. Preheat the oven to 175 degrees. Oil 1 large or 2 small cake tins.

2. Beat the butter and sugar until white and fluffy.

3. Add the eggs, one at a time, mixing well after each addition. Continue beating for several minutes after all the eggs have been added.

4. Mix all the dry ingredients in a bowl. Add to the creamed butter mixture together with all the water, mixing slowly at first and then a little faster as the flour gets incorporated. Beat for several minutes.

5. Pour the batter into the prepared cake tins. Bake in the oven for about 30-40 minutes, depending on the sizes of the tins used.

6. Remove from the oven and let the cakes cool completely. Cut the top of the cake of and divide them in half. Fill with different fillings, depending on which favour you want. I used my caramel cream and oreo cream fillings. Raspeberry mousse also works great with this chocoalte flavoured base.


White Chocolate Cream Cheese Frosting: (Check out Manuela's version)


250 g white chocolate
340 g natural cream cheese
85 g butter
1 1/2 tbsp creme fraiche
1 tsp vanilla essence
1/2 dl icing sugar
food colouring

1. Melt the chocolate carefully.

2. Mix the rest of the ingrediants in a blender very quickly. Add the chocolate and mix until combined.

3. Pour the icing into a bowl and put in the fridge for at least 1 hour.

4. Take out and mix with an electric beater until desired consistency.

Happy baking,
Love Heidi

Sunday, 6 March 2011

Chocolate dreams


Hello everyone!

Hope that you're having a wonderfully fun week-end! Mine has been great! Full of fun times and many memories!

It's still pretty cold outside here in Sweden, but luckily the sun is starting to show it's face a little bit more often. But while it's cold outside I'm filling up my freezer with yummy cookies...perfect to take along on the many spring picnics I'm so looking forward to ;-).

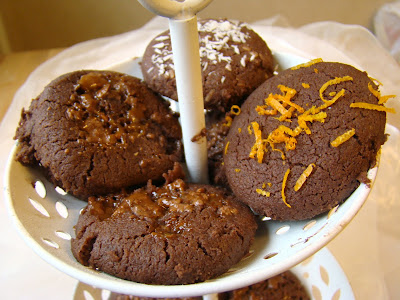
I recently made these chocolate cookies for Jnytt. But instead of making the whole batch the same way, I decided to try different flavours: orange, coconut and Daim (a typical Swedish chocolate). The Daim one was my absolute favourite, but all of them are worth a try.

To see this recipe in Swedish, click here.

Chocolate dreams: Makes about 30 cookies

250 g butter (room temperature)
¾ dl sugar (75 ml)
3½ dl flour (350ml)
1 yolk
3 tbsp cocoa
1 tsp vanilla sugar

1. Mix the butter and sugar until a light yellow colour. Add the yolk and mix a little bit more.
2. Mix the dry ingredients into the butter and mix until it forms a dough.
3. Make small balls of the dough and press down slightly onto a baking sheet (with waxpaper). Bake at 175 degrees for about 15 minutes.
TIPS:

Orange and chocolate flavoured cookies:


Mix in 1 tbsp orange zest in step 2 and continue as normal.

Coconut and chocolate cookies


Mix in 3 tbsp dessicated coconut in step 2 and continue as normal.

Daim cookies


Mix in 1 slab of Daim (finely chopped) in step 2. Before you bake the cookies sprinkle some more finley chopped Daim on the cookies.

Try to use real butter instead of marg when making cookies...you can really taste the difference!

Happy Baking!

Love,
Heidi
 
Blog Template by Delicious Design Studio