Friday 25 November 2011

Another South African classic!

Good morning everyone!

This autumn in Sweden has heen beautiful! This time last year we had already had snow for over a month here in Jönköping, but this year we have had really mild, pleasant weather. Which makes it seem crazy that Christmas is only 1 month away today! YAY! 

But before this blog becomes to Christmassy I thought I would put up another South African classic...Milktart! This is for you, Sara. Thank you for requesting the recipe! Feel free to request away!

Milktart is one of my absolute favourite South African recipes! There is just something about the creamy, vanilla flavour that I love! And the memories that come flooding in when I think about milktart...there's too many to think of!

Here comes the recipe:
(to see the recipe in Swedish click here)

1 packet Tennis biscuits (or if you're in Sweden then 1 pack Brago original biscuits and 1 dl coconut will do the job)

100 g butter or marg, melted

Filling:

2 eggs
50 ml water
1 tbsp maizena
1 tbsp flour
1 salt salt
2 tbsp sugar
2 cups (5 dl) milk (3 %)
½ tin condensed milk
30 g butter

Cinnamon

1. Crush the biscuits finely. Add the melted butter and mix around. Press themixture into a pie form and put it into the fridge.
2. Filling: separate the yolks and the whites. Mix the yolks, maizena, flour and salt together. Add the water and mix a little bit more. 
3. Beat the egg whites until they are stiff peaks. Add the sugar and beat for 2 more minutes. 
4. Put the milk, condensed milk and butter in a pot and bring to the boil. Add the yolk mixture and bring to the boil again, stirring constantly. Remove the pot from the stove and fold in the egg whites. 
5. Pour the mixture over the base and then into the fridge for at least 3 hours. Before serving sprinkle lots of cinnamon on top. 

Happy baking!

Love,

Heidi

Christmas is nearly here!

Christmas in Sweden is one of my absolute favourite times of the year! Partly because of the build-up towards the big day. The four Sunday's before Christmas the Swedes celebrate "advent" with lots of candles and good food! This Sunday is going to be "the First Advent" which means that here in sweden we are finally allowed to put up Christmas decorations. So now you know what I will be doing this week-end!

Today Jnytt Extra's Christmas issue came out, together with an article where I made some typical Swedish Christmas sweets but with my own twist.

Click on this link to check it out!
http://issuu.com/jnytt/docs/december_2011/35


Photo by Cathrine Levan
 Do you want to get into the Christmas mood? Here come some of the recipes: (to see these recipes in Swedish, click here: http://jnytt.se/nyhet/43934/heidis-julgodis)

Chocolate snowballs:

Photo by Cathrine Levan

150 g butter, room temperature
200 ml sugar
1 tbsp vanilla sugar
5 tbsp cocoa
350 ml oats
100 ml coconut
4 tbsp espresso
100g Daim, roughly chopped (Daim is a typical Swedish chocolate, can be substituted by using normal milk chocolate)

200g white chocolate
200 ml coconut

1. Mix the butter and sugar together. Add the rest of the ingredients (except the white chocolate and 200 ml coconut) and mix them together well. Roll the mixture into small balls (about 3 cm in diameter). Put them into the freezer for at least 30 minutes so that they get firm.
2. Melt the white chocolate carefully. Dip the chocolate balls in the white chocolate and then in the coconut.
A TIP: Once you have dipped the balls in the chocolate, drop them into a deep bowl with coconut and shake it around...it's much less messy that way ;-)

Photo by Cathrine Levan

Mini red velvet cupcakes with gingerbread icing:

60 g butter
150 ml sugar
1 egg
100ml buttermilk
1 tsp red food colouring
1 tsp vanilla essence
1 tsp bicarbonate of soda
1 tsp white vinegar
250 ml (1 cup) flour
50 ml cocoa
1 pinch salt

Icing:
50 g butter
100 ml cream cheese
1 tsp vanilla essence
1/2 tsp of gingerbread spices (like cinnamon, cloves and ginger)
200 ml icing sugar

1. Preheat the oven to 180 degrees.
2. Beat the butter and sugar until creamy. Mix in the egg, buttermilk, food colouring, vanilla, bicarb and vinegar.
3. In a separate bowl, mix the flour, cocoa and salt together. Add them to the wet ingredients and stir until they are just mixed.
4. Fill mini cupcake cases until just over half full.
5. Bake in the oven for about 8-10 minutes. Cool completely.

Icing:
1. Make sure all the ingredients are at room temperature. Beat all the ingredients together with an electric beater for a few minutes until the icing is creamy and smooth. Pipe the icing onto the cupcakes and decorate with some sprinkles.

Watch this space for some more recipes!


Have a great day!

Love,
Heidi

Monday 21 November 2011

A real "braai"

Being in Sweden one of the things that I miss most from South Africa (excluding my family of course...and the warm weather...and the beach...) is a REAL braai. Now, don't get me wrong, people have plenty of "grill parties" here in Sweden and some of them produce some pretty good food...BUT!!!

They just don't compare to a REAL South African braai. And I think that one of the main reasons for this is the fact that there is nothing...NOTHING even close, to South African boerewors. For those of who who are underprivileged and have never tasted boerewors, or worse yet, don't even know what it is...let me explain.

Boerewors is a LONG sausage filled with minced meat and a delicious combination of spices. The fun thing with boerewors is that you braai the whole long sausage in one pieces (quite an art!), which keeps the wors nice and juicy and flavoursome.

Luckily I am blessed with lovely friends here in Jönköping. So during the summer, Lisa and I decided to have a go at having a real South African braai, boerewors and all!


So we bought in the necessary ingredients and got going and we had loads of fun along the way! Somehow we ended up without a working machine to stuff the sausages with so we had to do it by hand! Ha ha! It took a LONG time, but in the end it worked out so well!

What is a sausage without the sausage "skin"?

The mince mixture, ready to be stuffed


I was also lucky enough to have my mom here in Sweden so she made her DELICIOUS "pap en sous". Pap is also typically South African and is a type of maize/corn porridge which is eaten together with a sauce made from tomatoes and onions that has simmered together for many hours. Together with good friends and more good food, all in all, the braai was a success!!!

This is what a REAL braai looks like!


Delicious!!!


Boerewors recipe:

1 kg minced meat (50% pork, 50% beef)
25 ml whole coriander seeds, grounded
2 tsp salt
1 tsp ground black peppar
2 garlic cloves, crushed
1 pinch ground nutmeg
1 tbsp brown sugar
100 ml (1 dl) red wine vinegar

Sausage casings, soaked in water

1. Mix all the ingredients together in a bowl.

2. Drain the sausage casings and put one end over a filling horn. Carefully pull the whole casing onto the horn, leaving about 5 cm off. Tie a knot in this end.

3. Having 2 pairs of hands at this stage is really helpful. Feed the filling into the filing horn while your assistant guides the casing on the other side, moulding the sausage by hand to make it uniformly thick.

4. Once all the meat has been stuffed, remove the casing and tie a knot on the end.

5. Braai over medium hot coals until the skin has a nice grilled, brown colour and the inside is still juicy.

Happy braaing!

Love,
Heidi


Firetruck fun!

So my little boy is not so little any more...over the week-end we celebrated his 3rd birthday party. It was so much fun. In the midst of the craziness of writing my thesis and extra jobs, somehow we managed to find the time to throw together a lovely party for Elias. 

He has really been into firetrucks lately, so he wanted to have a firetruck party. I got inspired to build a firetruck from boxes so that the kids could play with it at the party. So one night I came up from the basement with a bunch of boxes and put my dear man into work. This year, I must give him the credit with coming up with many ideas that made the party a success...like paper machèing the firetruck. It would not have looked nearly as nice without the paper machè. So after several nights work in the basement the firetuck was ready to go!

We sent out firetruck invites to a few of Elias' friends and prepared snacks for about 20 people. I also made cute little firetruck badges for the kids and organised fireman helmets. The kids got to eat and play around together and then it was time for the cake. 

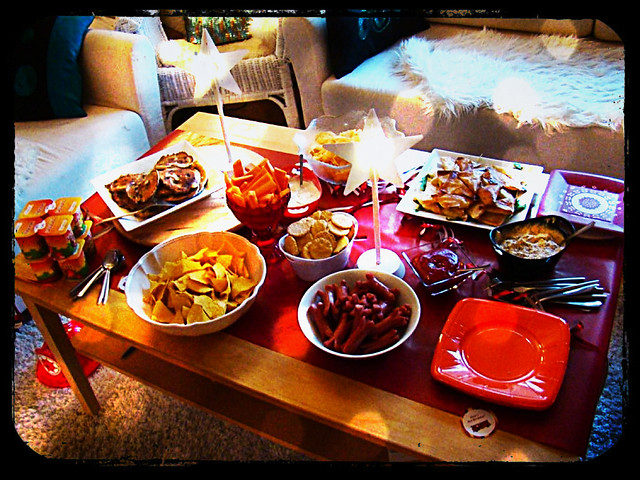
Cheese and corn samoosas, hummus, blueberry pancakes...

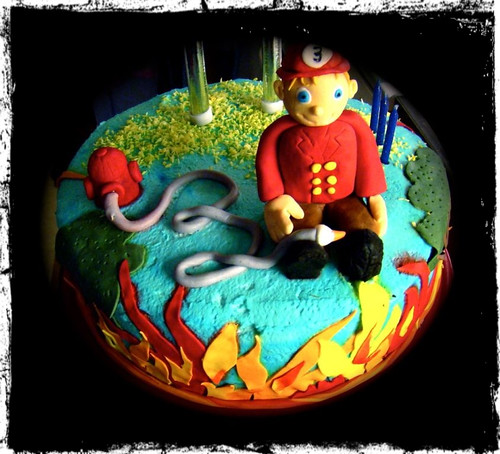
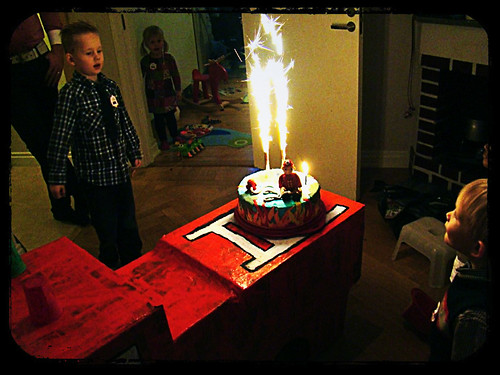
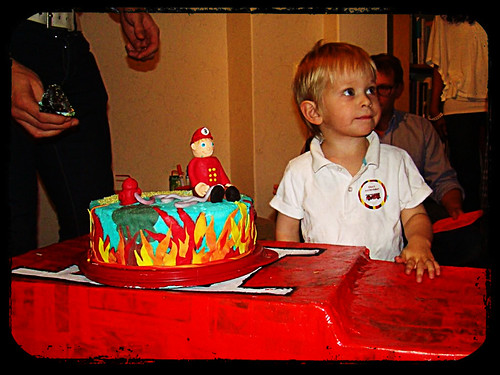
The cake was vanilla sponge with chocolate ganache and cream filling. One of the layers also had daim balls (daim is a swedish chocolate with a crunchy caramel filling). I'm always trying to find ways to get around covering a cake with fondant as I think fondant is so sweet. So this time I coloured cream a light blue and covered the cake so that the background would look like the sky. It didn't look as nice as fondant but it definately tasted better. I then made trees and buildings from fondant covered with flames around the whole side of the cake. On top was fireman "Elias" with a hose. The cake made its grand entrance into the party on top of the firetruck with small firework candles on top. It was so much fun to see the expressions on the children's faces...priceless and definately worth a week of short nights. Unfortunately I forgot to take a good picture of the cake during daylight. Oh well...better something than nothing.

All in all it was a party with many fun memories! And I am so grateful to have the most precious son in the world and the most loving and helpful hubby in the world!

Stay tuned for some fun, home-made Chritmas present ideas and other goodies to get you into the Christmas spirit!

Love,
Heidi

Tuesday 6 September 2011

Weddings are fun!

Okay! It's finally time to show off the wedding cake that I made for a friend's wedding in August! It was a beautiful wedding for a sweet couple. The theme for the wedding was simple, silver, white and lime green. The cake was a 4 tiered square cake that rotated slightly. It's definately the biggest cake that I've made to date, and there are many things I learnt along the way. Here are some of those lessons:

1. Big cakes need LOTS of space...both when working with them and in the fridge. Luckily I have a pretty large fridge, so even the base of the cake fitted in the fridge...well, I actually measured the fridge first to make sure the cake would fit, because as you know, it was the middle of summer...and creamy cakes NEED to live in a fridge! The cupcakes I kept in the freezer so it all worked out pretty well.

2. Rolling out HUGE pieces of fondant by hand is not easy! Whenever you roll fondant to cover a cake it has to quite a bit bigger then the actual cake so that you don't end up with wrinkled sides. That means that the fondant for the bottom tier had to be almost 1 meter(about 0.8m to be exact). Now that's pretty easy when you watch the Cake Boss and all those shows where they have machines to roll the fondant perfectly smooth...not so easy doing it at home. But with a little bit of patience it turned out ok as well.

3. Dress warmly! Well, not when you are baking the cake, but I had to transport the cake about 3 hours to Malmö, in an air-conditioned car. I have never transported cakes so far, so I wasn't sure how it would turn out, but, thankfully nothing happened along the way. It's a pity I forgot my socks though...my toes were pretty blue when I got there!

All in all...agreeing to do a wedding cake takes a lot of planning and precision...but it's definately worth it when you see the happy couple!
 
Cheers to you, Håkan and Emma! We wish you many happy years together and many blessings over your lives!

Love,
Heidi

Tuesday 23 August 2011

Sneak preview of what is to come...

Oh dear...it has been a hectic summer...which means ZERO time for updating blogs. I hope that ya'll haven't missed me too much! ;-)

A few weeks ago I had the biggest order up-to-date...100 cupcakes plus a wedding cake for 130 people...for a special friend's wedding. Unfortunately this HUGE order (which by the way was all made in my tiny kitchen...miracles can happen) also coincided with the death of my precious morfar (grandfather). More on both of these events later...I just wanted to send a sneak preview of the cupcakes and hopefully get you excited for seeing THE cake!

I'm pretty happy with how it all turned out!


That's it for now.

Love,
Heidi

Thursday 21 July 2011

Kärleksmums...

Love is always in the air in Sweden during the summer. There are usually many weddings to attend and many wedding pictures to look over! It's a fun time of year!

This year I have several wedding cakes/cupcakes lined up so it's pretty exciting! A few weeks ago I made a delivery for a cute couple that live close to me and wanted to have cupcakes for their wedding and a little cake as well. They have a great company that works with events and catering, you can check their homepage out here. They wanted pink polka dot cupcake holders with a "kärleksmums" cupcake..which is a chocolatey cake with a delicous icing. "Kärlek" means love in Swedish, so it kind of suits a wedding, don't you think? They also wanted fresh strawberries to decorate the cupcakes. For the cake: they wanted a pink cake, a "princesstårta" which is also a Swedish classic, with chiffon cake layered with a vanilla cream. On the same day of their wedding, I was attending some of my dear friend's wedding, so I was only able to deliver the cake and cupcakes and not set it up at the location, which I usually like to do. But they promised to send photos of what it looked like on the day. I'll keep you posted!

This is how they turned out:


Wednesday 6 July 2011

Heaven in a bite...

If you have been to Sweden you most probably know what "kladdkaka" is. Even if you haven't been here but have Swedish friends you have probably tasted this Swedish classic. It is AMAZING!!!

If you have been to Sweden you most probably know what "kladdkaka" is. Even if you haven't been here but have Swedish friends you have probably tasted this Swedish classic. It is AMAZING!!!

For those you have not yet had the privilege of tasting this delicious "cake", here is the recipe...so get to your kitchen and try it out, because, yes...it IS so good. The closest that South Africans come to this is chocolate mud pie, which kind of explains what the "kladdkaka" is all about. Directly translated it means "sticky cake". And that's what it is. Sticky, gooey, chocolatey, amazing cake.

The number one secret with getting a perfect "kladdkaka" is not to mix the ingredients too much and not to have it in the oven for too long. It almost still needs to be jiggly in the middle when you take it out.

This "kladdkaka" is usually made in a round pie form, but I also like to make them as cupcakes. The one's in the pictures are topped with a nougat and raspberries. Absolute bliss!


Enough talking...here's the recipe:

Makes about 6-8 portions (if you are a chocolate lover like me, make that 2-4 portions ;-) )

2 eggs
1 cup (2 1/2 dl) sugar
4 tbsp cocoa
1 tsp vanilla essence
100g melted butter/margarine
100 ml (1 dl) flour
1 pinch of salt

1. Preheat the oven to 180 degrees C.
2. Mix the egg and sugar by hand for about 2 minutes.
3. Add the rest of the ingredients and fold then carefully in.
4. Pour the batter into an oiled pie form.
5. Bake for 15-20 minutes. Keep a close eye on your cake as each oven varies slightly in strength.
6. Serve either warm or cold, together with ice cream and cream.

Happy eating!

Love,
Heidi

Thursday 30 June 2011

Jnytt TV

This week I had the opportunity to bake cupcakes on Jnytt's webTV. It was a fun experience! It was also one of the brightest days we've had so far this summer so filming in my kitchen was a bit tricky, but it worked out pretty ok. I made lemon poppy cupcakes with white chocolate frosting. The recipe I used was my easy all-in-one cake batter (click here to check it out...). I added the zest and juice of 1/2 a lemon and about 2 tsp lemon poppy seeds and mixed it into the batter instead of the cheesecake filing. You can find the frosting recipe here.

Here's some pictures from some cupcakes I made a few days ago. Cute, aren't they?


Click here to watch some of my best cupcake tips!

I'm off to go and prepare some cupcakes and a cake for a wedding on Saturday!

Have a great day everyone!

Love,
Heidi

Sunday 26 June 2011

Birthday blues...

Birthdays are always fun! The older you get the more you should celebrate your birthdays...but many times it's not like that. Many people have terrible anxieties about getting older, which is understandable if you think that for every year that goes by you have 1 year less to live.

Put that way, it sounds really depressing! At times I look forward to growing old...having a life full of memories, both good and bad behind me to keep me content. Knowing that I've been down a road which no-one has gone, learning from the mistakes made and spreading love to those around me...

Yet, at other times, the thought of my now 2-year old son one day shooting up above me and becoming a man or my hair starting to turn grey is a daunting thought and looked forward to with a mixture of dread and anticipation. For me, the secret I think, is in how I live now...making the most of today. Today is all I have, and if I give everything to my life here and now, that's what's going to fill me up with those warm memories...

Even when life has moved many years on, being able to look back and say "I've lived the life I wanted to live. It wasn't always what I planned but somehow God has turned everything for the good", that's what I really look forward to!

I hope you are looking forward to the adventures of life and learning to live today to the full!


Happy 50th birthday, Marianne! You are loved and appreciated!

Tuesday 14 June 2011

Strawberry and raspberry compote

I absolutely love surprises! They always make me so happy. And the other day I got a really great surprise.

My car was parked at my church while I was at varsity, and after a long hard day of preparing for a big presentation I came to my car and saw that someone had tied a bag of rhubarbs to my car. I'm still not sure who it was, but thank you to that person! You made my day!

One of my favourite things to do with rhubarbs is to stew them, especially together with strawberries. The flavours combine so well and it can be used for so much. It's a great dessert together with some white chocolate cream. It's great with some yoghurt or porridge for breakfast. It also works great as a filling between 2 layers of cake. Fill a pretty jar up with the compote and you have a perfect present to give away!


Here's the recipe:

3 rhubarb stalks
1kg frozen strawberries (or 1 litre fresh)
1 dl sugar (can adjust to your desired level of sweetness)
2 tbsp water
2 tsp cardemom seeds, ground
½ vanilla pod

1. Trim the rhubarbs and remove the outer skin. Cut stalks into small pieces.
2. Put all the ingredients (except the vanilla) in a pot and simmer for about 1 hour.
3. Scrape out the vanilla from the pod and mix it into the compote.
4. Serve with some white chocolate cream and lots of love


Another thing that makes me happy is seeing how many new people come by and visit me on my blog! I hope you enjoy!

Have a wonderful day!

Love,
Heidi

"Först med det senaste!"

Recently I made a cake for one of Jönköping's local newspapers,Jnytt. I don't often get to taste the finished product. I've often thought about trying to find some sneaky way to taste a piece of the cake without it being noticed...but I've realised that I will just have to be content with tasting the crumbs ;-). I didn't get to taste this one either, but rumour has it that it was really tasty. Whenever I hear that, I can breath out. It means that I din't mix up the sugar with the salt or do any other crazy blunder...

So, how did the cake taste? Well..it was a vanilla cake with blackberry mousse, white chocolate mousse and lemon curd. Yummy and fresh! I basically had free hands witht the decoration - as long as it had black and pink in it, the name of the newspaper and "Först med det senaste" on it.

This is how it came out.


I'm pretty happy about it, what do you think?

Love Heidi

Exciting adventures!

So, a while back I got a phone call from a man who has a project to help start 100 food companies during 1 year. He heard about me and gave me a call to ask if I wanted to be on the local news with him. So I got my 30 seconds of fame ;-) and I'm in the process of starting my own company, specialising in personalised cakes and cupcakes. You can read more about it here!

Watch this space for updates about my new adventure that lies ahead!

Tuesday 7 June 2011

Summer time!

Hello everyone!

The last month has been CRAZY and SO much fun! I haven't been on here much, but now that varsity is over for this term I am back! Aren't summer holidays great!

Here comes a sneak preview of what I've been up to! Come back soon to find out more!


Have a great day!

Love,
Heidi

Wednesday 4 May 2011

Strawberry cheesecake cupcakes...

Phenomenal cupcakes...seriously. These things take cupcakes to a new level! In the middle of these delicious vanilla cakes lies the most delicious strawberry cheesecake filling, and to top it off...the most amazing white chocolate icing. That may seem like a pretty exaggerative explanation...but seriously, they ARE that good!

You have to try for yourself!


Makes 12 cupcakes:

(To see this recipe in Swedish, click here)

Vanilla cupcakes:

120 g melted butter or margarine
2 eggs
180g flour (about 400ml)
1 ¼ dl milk
140 g sugar (about ¾ cup)
1 pinch salt
2 tsp baking powder
1 tsp vanilla essence

Cheesecake filling:

100g cream cheese
1 egg
2 tbsp sugar
1 tsp vanilla essence
150 ml strawberry puré (made easily by blending half frozen strawberries)

1. Preheat the oven to 180 degrees. Put cupcake liners in a muffin tray, use 6 big ones or 12 normal sixed liners.
2. Mix all the ingredients for the cupcakes in a bowl.
3. In a separate bowl, mix all the ingredients for the cheesecake (except the strawberry) until smooth. Once smooth, add the strawberry puré and stir a few times.
4. Put some batter in the liners, then about 1 tbsp cheesecake filling, and top it off with some more cupcake batter, until the liners are about ¾ fill. The cheesecake filling is quite runny so some of it comes to the top, but that just adds to the marbled effect.
5. Bake in the middle of the oven for about 20-25 minutes. Let them cool completely.
6. Top with my favourite icing (you can find the recipe here) and some fresh strawberries.

Happy baking and delicious eating!

Love,
Heidi

Sunday 1 May 2011

3-course breakfast

Happy 1 of May everyone! I hope that this month will fill of lovely moments and lots of laughter! To sound all clichéd, I can't believe it is already May. Time is flying by! So take the opportunity to make the people around you feel special and loved! Enjoy each moment you have!

Have you ever had a 3-course breakfast? I hadn't...until Good Friday. We had some friends come over for brunch, and I thought, "Why not make it a 3-course brunch?" So I did!

This was the menu:

Starter: Yoghurt and muesli cocktail


Vanilla or Greek yoghurt layered with muesli, dried fruit and roasted pumpkin seeds and coconut. Topped with red cranberries and honey. It was delicious and so refreshing. The smell of the coconut roasting in a frying pan was OH so delicious!

Main course: This was a typical South African breakfast with fried eggs and bacon, fried tomatoes, mushrooms and onions served with fresh orange juice. I forgot to take a picture of this part.

"Dessert": Cardamom scones with orange & lemon curd


Makes about 8 scones:

To see this recipe in Swedish click here.

400 ml flour
½ tsp salt
2 tsp baking powder
50g butter
150 ml buttermilk
1 tsp cardomom

1. Preheat the oven to 250 degrees C.

2. Mix all the dry ingredients in a bowl. Add the cubed butter and rub in with your finger tops. Mix the buttermilk into the dry ingredients.


3. Make balls about the size of your palm with the dough and place them on a lined oven tray. Brush with some milk and sprinkle over some sugar.

4. Bake in the oven for about 10 minutes until golden brown. Serve warm with the orange and lemon curd.

Orange & lemon curd
Makes about 1 cup
(Make at least 1 day in advance)

2 lemons
2 oranges
200 ml sugar
85g butter
3 eggs
1 egg yolk

1. Wash the oranges and lemons well. Grate off the zest. Squeeze the juice of 1 orange and 1 lemon.
2. Mix the juice, zest, sugar and butter in a stainless steel bowl. Stir the eggs into the mixture.
3. Put the bowl over a pot of boiling water until the curd thickens. Don’t let the curd boil. It takes about 15 minutes for it to thicken properly.
4. To get an extra creamy and smooth texture, pour the mixture through a sieve while still hot. Pour into a glass jar and store in the fridge.


Have a lovely week!

Love,
Heidi

Thursday 28 April 2011

My favourite icing!

Today I made some DELICIOUS strawberry cheesecake cupcakes. They were SOOO good! I will share the recipe with you all in a few days, but to start with I will share my FAVOURITE frosting/icing recipe that I used to decorate the cupcakes with. I often use it when I make cakes as well...like this one. It is so tasty and the flavours are well balanced. Why don't you give it a try?

(För att se receptet på svenska titta lite längre ner på sidan)

White chocolate icing:

Enough to ice about 12 cupcakes

250 g white chocolate
340 g natural cream cheese
85 g butter
1 1/2 tbsp creme fraiche
1 tsp vanilla essence
1/2 dl icing sugar
food colouring (if needed)

1. Melt the chocolate carefully.

2. Mix the rest of the ingrediants in a blender very quickly. Add the chocolate and mix until combined.

3. Pour the icing into a bowl and put in the fridge for at least 1 hour.

4. Take out and mix with an electric beater until desired consistency.

Vitchoklad glasyr:

250g vitchoklad
340g mjukost
85g smör, rumstemperatur
1 1/2 msk creme fraiche
1 tsk vaniljsocker
1/2 dl florsocker

1. Smälta chokladen försiktigt

2. Lägg alla ingredienser (förutom chokladen) i en skål och mixar med en stavmixer. Blanda ner chokladen och mixar väl.

3. Låt vila i kylskåpet i minst 1 timme.

4. Mixar med elvisp till önskad konsistens.

Tuesday 19 April 2011

Smoked salmon bruschettas

This is my new favourite recipe...

Seriously!

It's delicious! And looks great! And is oh so simple to make!

There's a TV show in Sweden called "Halv åtta hos mig" (which basically means: Half past seven at my place), and even though we don't have a TV, I try to catch the show as often as I can on the internet. The show works like this: there are 4 contestants, who invite each other to their homes, for a 3-course meal. After each evening, the guests vote for their host and the host that gets the most points at the end, wins...simple as that! Anyways, I often think about what 3-course meal I would master up for my guests...

I at least have a good starter!

So why not try it out...I'll be there, half past seven at your place!


Makes about 12

To see this recipe in Swedish click here.

1 rustic baguette
150g smoked salmon, thinly sliced
1 small garlic clove
2 tbsp olive oil
1 dl (100ml) mixed seeds: pumpkin seeds, sunflower seeds, pine nuts...
Parmesan

Dill and lemon oil:
3 tbsp olive oil
1 tbsp finely chopped dill
1 tsp lemon zest
1 tbsp lemon juice
salt and pepper

This is how:

1. Put the oven on 200 degrees celcius.

2. Cut the baguette diagonally i 12 thick slices. Mix the crushed garlic and olive oil. Sprinkle over the bread and bake in the oven for about 15 minutes until the bread has hardened and become golden brown.

3. Roast the seeds in a dry pan.

4. Put the salmon on the bread, top with the seeds and some slices of parmesan.

5. Mix all the ingredients for the dill oil and sprinkle on top.

Wednesday 13 April 2011

Starwars forever

I have to be honest...I'm NOT a Starwars girl. I don't even think that I've watched anything to do with Starwars...definately not enough to know who any of the characters are. So when I was going to do a cake for a friend's 5 year old, and found out that he LOVES Starwars, I took on the challenge of delving into the world of Yoda and his gang.

I decided to tackle this cake in one night, I started at about 8 and ended at 3 in the morning, but I'm pretty happy with how it turned out! Take a look...


Delicious memories

I remember many years ago I had the opportunity to go with my family and some Dutch friends to a luxurious private game farm in South Africa. The excitement before the trip was insurmountable and rightly so.

It is an experience that I remember clearly...for several reasons: firstly, in my young and impressionable mind who hadn't experienced many of the luxuries of the world, the opportunity to stay in a luxury chalet with an amazing view, fantastic service and a private outdoor shower.

The other thing I remember was the private safaris that we had, with our very own private (and oh so handsome) game ranger. The safaris were full of many laughs and fun times together with my family, with cosy tea-times on top of hills with fantastic views. Another thing I remember from this trip was the beautiful animals that we saw, we got about 6 m away from a mommy cheetah with 4 cute little cubs and we went walking through the bushes tracking elephants and learning how to put a "bush-thinking" cap on.

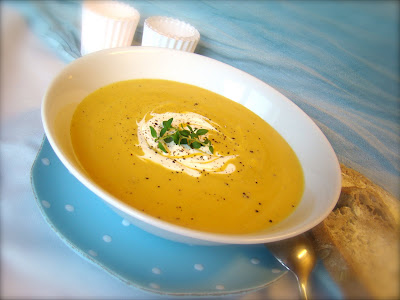
Finally, one of the last things that have stayed with me from that trip was the delicious food that we got to feast on. It was on this trip that my passion for food really started awakening. It was on this trip that I tasted the most delicious soup of my life - Butternut and orange soup. Since then I have been on a mission to recreate this soup and I have finally gotten close enough to be able to share the recipe. Be prepared for the best soup of your life! Butternut is one of my favourite vegetables to use, as it has so much flavour. It isn't that common here in Sweden, but lately I've been able to find it at most of the big grocery stores. This is what a butternut looks like:


Butternut and orange soup:

(This recipe makes enough to feed many people)

To see this recipe in Swedish click here.


1 butternut
1 onion
2 garlic cloves
50g butter
1 celery stalk
½ red chilli, finely chopped
2 cups (5 dl) chicken (or vegetable) stock
½ orange, zest and juice
1 tsp ground nutmeg
1 pinch cinnamon
1 pinch white pepper
1 bay leaf
½ tsp curry
1 dl cream

1. Roughly chop the onion and celery. Sauté them lightly in the butter together with the crushed garlic and chilli in a big pot.
2. Peel the butternut and chop into large cubes. Put the butternut in the pot together with the stock, orange zest and juice and all the spices. Boil for about 30 minutes until the butternut is soft. Remove the bay leaf and blend until smooth.
3. Season with Salt and pepper. Stir in the cream just before serving.

I hope that you enjoy this soup! What is your favourite soup?

Have a great day!

Love,
Heidi

Wednesday 30 March 2011

Rocky Road Cupcakes

Hello everyone!

This week has been full of baking and caking, so there are many exciting recipes and photos waiting to be written about! I recently found a wonderful book at Åhléns in Jönköping that was all about Cupcakes, cookies and cheesecakes. It is so full of fun and inspiring ideas that I can't wait to try out!


The first recipe that I tried was their Rocky Roads Cupcakes. Like usual, I hardly ever follow a recipe exactly as it stands, I'm always finding ways to put my own touch on something. But even so, I seriously LOVE cookbooks...I could sit for hours just looking and being inspired!

Here's the recipe my way: (to see this recipe in Swedish click here!)

Rocky Road Cupcakes, makes about 12


125g butter or margarine, room temperature
½ tsp vanilla essence
1½ dl sugar (150ml)
2 eggs
2½ dl flour (1 cup)
1½ tsp baking powder
¾ dl milk (75ml)
1 tbsp cocoa
2 tbsp extra milk

Rocky road topping:

500g milk chocolate, melted
50g pistachio nuts
50g cashew nuts
50g mini marshmallows

Here's how:
1. Preheat the oven to 180 degrees C. Line a muffin tray with paper liners.

2. Beat the butter, vanilla and sugar for about 5 minutes. Mix in one egg at a time. Beat for a few more minutes until light and fluffy.

3. Mix in the flour, baking powder and milk.

4. Divide the batter into 2 bowls. Mix the cocoa and the 2 tbsp milk and add to one of the batters.

5. Put a lillte of each batter into the cupcake liners. Stir around gently with a toothpick to get a marbled effect.

6. Bake in the middle of the oven for 20 minutes. Let cool completely.

7. Mix all the ingredients for the Rocky Roads in a bowl. Top each cupcake with a spoonful. Drizzle a little bit of dark chocolate over the top.

Happy baking!

Love,
Heidi

Monday 21 March 2011

Hello Kitty!


Hello everyone!

Wow, what a busy 2 weeks it has been! Life has been a rollercoaster of fun and exciting events!

This week-end we had time to go to a sweet little girl's 4th birthday party! It was a Hello Kitty party, so for the first time ever, I made a Hello Kitty cake. It was really cute!


Lately I've been trying out some new tricks for my cakes. Nothing really beats the look of a cake covered in fondant, but at the same time it's really sweet and not always nice to eat too much of...especially here in Sweden. So instead of covering a whole cake in fondant, I have been covering it with delicious cream cheese frostings instead!!! Even though there is definately a time and a place for fondant covered cakes, I'm learning that sometimes it can be just as nice with a good frosting and some sweet fondant decorations.

For this Hello Kitty cake I made some of the decorations with marsipan and some with fondant. It was perfectly cute for a little girl!


For the base of the cake I wanted to try a new recipe, so I took one from Manuela's blog (Passion for baking). While I was there I found a great white chocolate and cream cheese frosting recipe which I gave a try, with a few little changes here and there...and OH MY WORD...it's my new favourite icing/frosting recipe!!!


Here they are:

Chocolate base: (Can also be found here)


200 g butter or margarine, romms temperature
3 dl sugar (300ml)
1 tsp vanilla essence/sugar
3 eggs
1,5 dl cocoa (150 ml)
5 dl flour (2 cups)
1/2 tsp baking powder
1 1/2 tsp bicarbonate
1 tsp salt
3 dl water

1. Preheat the oven to 175 degrees. Oil 1 large or 2 small cake tins.

2. Beat the butter and sugar until white and fluffy.

3. Add the eggs, one at a time, mixing well after each addition. Continue beating for several minutes after all the eggs have been added.

4. Mix all the dry ingredients in a bowl. Add to the creamed butter mixture together with all the water, mixing slowly at first and then a little faster as the flour gets incorporated. Beat for several minutes.

5. Pour the batter into the prepared cake tins. Bake in the oven for about 30-40 minutes, depending on the sizes of the tins used.

6. Remove from the oven and let the cakes cool completely. Cut the top of the cake of and divide them in half. Fill with different fillings, depending on which favour you want. I used my caramel cream and oreo cream fillings. Raspeberry mousse also works great with this chocoalte flavoured base.


White Chocolate Cream Cheese Frosting: (Check out Manuela's version)


250 g white chocolate
340 g natural cream cheese
85 g butter
1 1/2 tbsp creme fraiche
1 tsp vanilla essence
1/2 dl icing sugar
food colouring

1. Melt the chocolate carefully.

2. Mix the rest of the ingrediants in a blender very quickly. Add the chocolate and mix until combined.

3. Pour the icing into a bowl and put in the fridge for at least 1 hour.

4. Take out and mix with an electric beater until desired consistency.

Happy baking,
Love Heidi

Sunday 6 March 2011

Chocolate dreams


Hello everyone!

Hope that you're having a wonderfully fun week-end! Mine has been great! Full of fun times and many memories!

It's still pretty cold outside here in Sweden, but luckily the sun is starting to show it's face a little bit more often. But while it's cold outside I'm filling up my freezer with yummy cookies...perfect to take along on the many spring picnics I'm so looking forward to ;-).

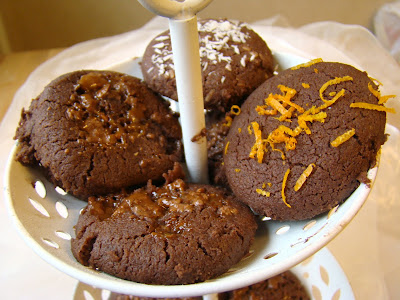
I recently made these chocolate cookies for Jnytt. But instead of making the whole batch the same way, I decided to try different flavours: orange, coconut and Daim (a typical Swedish chocolate). The Daim one was my absolute favourite, but all of them are worth a try.

To see this recipe in Swedish, click here.

Chocolate dreams: Makes about 30 cookies

250 g butter (room temperature)
¾ dl sugar (75 ml)
3½ dl flour (350ml)
1 yolk
3 tbsp cocoa
1 tsp vanilla sugar

1. Mix the butter and sugar until a light yellow colour. Add the yolk and mix a little bit more.
2. Mix the dry ingredients into the butter and mix until it forms a dough.
3. Make small balls of the dough and press down slightly onto a baking sheet (with waxpaper). Bake at 175 degrees for about 15 minutes.
TIPS:

Orange and chocolate flavoured cookies:


Mix in 1 tbsp orange zest in step 2 and continue as normal.

Coconut and chocolate cookies


Mix in 3 tbsp dessicated coconut in step 2 and continue as normal.

Daim cookies


Mix in 1 slab of Daim (finely chopped) in step 2. Before you bake the cookies sprinkle some more finley chopped Daim on the cookies.

Try to use real butter instead of marg when making cookies...you can really taste the difference!

Happy Baking!

Love,
Heidi

Monday 28 February 2011

Banana and caramel pie

One of my favourite combinations in the world is banana and caramel. I don't know what it is about the flavours that are SOOO delicious, but mmmmm. Just thinking about it makes my mouth water. A while back, one of my recipes for the newspaper I write for was a delicious banana, caramel and chocolate pie!

You WANT to try this...believe me! Unless you are like my sister and don't like the flavour of bananas...then you won't like it. Otherwise it's a MUST ;-)

To see this recipe in Swedish, click here.


8 servings

3 1/2 dl flour (350 ml)
1 1/2 dl sugar (150 ml)
1 dl cocoa (100ml)
1 tsp bicarbonate of soda
1/2 tsp baking powder
1 pinch salt
60 g butter or margarine
1 dl sour cream (100ml)
2 bananas
2 dl cream, whipped
1 tin of caramel (if you live in a country where you can't buy ready-made caramel, or you feel adventurous and want to make your own, click here to see how.)

1. Preheat the oven to 180 degrees C.
2. Sift all the dry ingredients into a bowl.
3. Rub the butter and dry ingredients together with your finger tops.
4. Press the dough onto a sheet of wax paper into a ball, about 20 cm in diameter.
5. Bake in the middle of the oven for about 20 minutes. Cool of a cooling rack.
6. Spread the caramel over the pie base. Top with the sliced bananas and whipped cream.

(I made 2 pie bases so that I could make a sandwich-like dessert. If you want a more filling "fika"* then this is the way to go!)

Enjoy your day!

Love, Heidi

* Fika is a well-known Swedish term for having a coffee break together with something nice and sweet!

Tuesday 15 February 2011

Birthdays and celebrations!

A few week-ends ago my wonderful parent-in-laws came down to Jönköping to celebrate Emanuel's mother's birthday. We had a lovely day together, swimming and relaxing at an indoor pool in Jönköping, eating good food, and just having a great time.

Instead of making a "traditional" cake, I thought that I would try something new and exciting.


First I made a choux pastry:

I used this recipe from taste.com

* 80ml (1/3 cup) water
* 40g butter, at room temperature, cubed
* 50g (1/3 cup) plain flour, sifted
* 2 eggs, at room temperature
* Vegetable oil, to grease

1. Preheat oven to 200°C. Place water and butter in a saucepan over medium heat. Put the lid on to reduce the water from evaporating and simmer until the butter is melted.
2. Add all the flour to the butter mixture at once and use a wooden spoon to beat until well combined. Place over low heat and cook, stirring, for 1-2 minutes or until the mixture forms a ball and begins to come away from the side of the saucepan.
3. Set aside for 5 minutes to cool slightly. Add the egg to the flour mixture, beating well with a wooden spoon. Beat until the mixture just falls from the spoon but still holds its shape.
3. Pipe the pastry dough into a round circle about 20 cm in diameter on a piece of waxpaper. Fill the circle with the pastry. Bake in preheated oven for 25 minutes or until the pastry is puffed and golden.
4. Remove from oven and turn the oven off. Immediately cut the top half of the pastry off. This is important in order to release the steam and prevent the pastry from becoming soggy. Return to the (turned off) oven and leave for 15 minutes to dry out. Remove from the oven and transfer to a wire rack to cool.

That's a basic choux pastry recipe. It can also be made into small, cute profiteroles. Once the round ring was done I lifted the top half off, filled it with some vanilla cream, topped it with some blueberries and raspberries, put the pastry lid back on, topped it with some more berries and decorated it with some icing sugar.

It looked kind of like a mess, but it was charming, and tasted so fresh and lovely. It's definitely a cake that I'm going to make again!

Happy baking!

Love
Heidi

Quick and easy meals: Cottage Pie

Hello everybody!

In the last few weeks there has been an increase in the amount of readers that I have, so I want to give all you new readers a very warm welcome. And a big thank you to my faithful readers for your lovely support. I hope that you enjoy what you see. Feel free to write comments and come with suggestions and ideas!

I'm in the middle of doing my internship at the International Office at my university.I have such wonderful colleagues...well at least they feel like colleagues, even though I'm just there for a little while. So now I'm getting a feel of what it is like to be a working woman. It's fun, but quite a change of routine. I'm used to studying and being on maternity leave for the past few years, so even though I've had lots to do, my time has been much more flexible. Now I know what it is like working and coming home in the evening and having to quickly prepare a meal.

Sometimes a meal thrown together in 20 minutes can be the best...both because they go so quickly to make and also because they can be really delicious! Last night we had some friends over for dinner, so it was one of those times when I needed to throw a meal together quickly. So I made a creamy version of cottage pie. And it was DELICIOUS! Easy to make and really tasty. It's also great to make a big batch and then freeze it in smaller portions for a quick and easy lunch.


When I made it I kind of just threw together different ingredients that I had at home, but I will try and give you the approximate amounts.

This recipe makes about 8 portions:

500 g mince
1 tbsp oil
3 garlic cloves, crushed
2 tbsp soya
1 tsp vinegar
1 tsp Worcestershire sauce
2 dl creme fraiche
2 dl cream
2 tbsp tomato puree
1 tbsp ketchup
1 bag of frozen peas, carrots and beans
Salt and pepper

1. Heat the oil in a frying pan, add the mince and fry for a few minutes. Add the crushed garlic, soya, vinegar och Worcestershire sauce and let it fry a few more minutes.
2. Add the cream, creme fraiche, tomato puree, ketchup and frozen vegetables and fry another 10 minutes. Season with salt and pepper (If the sauce is to runny, thicken with some corn starch).Put the mince into an oven-proof dish.

For the potato mash:
15 potatoes
2 dl creme fraiche
Salt and pepper
A handful of cheese

1. Peel the potatoes and boil them.
2. Mash the potatoes together with the creme fraiche. Season with salt and pepper.
3. Spread the potatoes over the mince. Sprinkle some cheese on the top and bake in the oven at 220 degrees for about 10-15 minutes, until golden brown.


What are some of your favourite quick meals to make?

Happy eating!

Love,
Heidi
 
Blog Template by Delicious Design Studio