Showing posts with label My favourites. Show all posts

Wednesday, 4 April 2012

Happy Easter!

Here are some cute cupcakes for Easter! And they are dangerously delicious! I have found my new favourite "go to" chocolate cake recipe...Ina Garten is my new hero:-). This cake comes with a warning: it is DANGEROUS! Only because it's so easy to make and it's so delicious! Don't say I didn't warn you...


To see this recipe in Swedish, click here.

From Barefoot Contessa at Home

Chocolate cake
butter for greasing the pans
1 3/4 cups flour
2 cups sugar
3/4 cup cocoa powder
2 tsp baking soda
1 tsp baking powder
1 tsp salt
1 cup buttermilk
1/2 cup vegetable oil
2 eggs
1 tsp vanilla
1 cup freshly brewed hot coffee

1. Make the cake: sift the flour, sugar, cocoa, baking soda, baking powder and salt into the bowl of an electric mixer on low speed until combined. In another bowl, combine the buttermilk, oil, eggs and vanilla.

2. With the mixer on low speed, slowly add the wet ingredients to the dry. with the mixer still on low, add the coffee and stir just to combine. Pour the batter into 2 buttered and floured 9 inch cake pans or into your cipcake wrappers. Bake the cake at 180 degrees C for 40-45 minutes and the cupcakes for 15-20 minutes. Cool completely before frosting.
Happy baking!


Love,

Heidi


Friday, 25 November 2011

Another South African classic!

Good morning everyone!

This autumn in Sweden has heen beautiful! This time last year we had already had snow for over a month here in Jönköping, but this year we have had really mild, pleasant weather. Which makes it seem crazy that Christmas is only 1 month away today! YAY! 

But before this blog becomes to Christmassy I thought I would put up another South African classic...Milktart! This is for you, Sara. Thank you for requesting the recipe! Feel free to request away!

Milktart is one of my absolute favourite South African recipes! There is just something about the creamy, vanilla flavour that I love! And the memories that come flooding in when I think about milktart...there's too many to think of!

Here comes the recipe:
(to see the recipe in Swedish click here)

1 packet Tennis biscuits (or if you're in Sweden then 1 pack Brago original biscuits and 1 dl coconut will do the job)

100 g butter or marg, melted

Filling:

2 eggs
50 ml water
1 tbsp maizena
1 tbsp flour
1 salt salt
2 tbsp sugar
2 cups (5 dl) milk (3 %)
½ tin condensed milk
30 g butter

Cinnamon

1. Crush the biscuits finely. Add the melted butter and mix around. Press themixture into a pie form and put it into the fridge.
2. Filling: separate the yolks and the whites. Mix the yolks, maizena, flour and salt together. Add the water and mix a little bit more. 
3. Beat the egg whites until they are stiff peaks. Add the sugar and beat for 2 more minutes. 
4. Put the milk, condensed milk and butter in a pot and bring to the boil. Add the yolk mixture and bring to the boil again, stirring constantly. Remove the pot from the stove and fold in the egg whites. 
5. Pour the mixture over the base and then into the fridge for at least 3 hours. Before serving sprinkle lots of cinnamon on top. 

Happy baking!

Love,

Heidi

Wednesday, 6 July 2011

Heaven in a bite...

If you have been to Sweden you most probably know what "kladdkaka" is. Even if you haven't been here but have Swedish friends you have probably tasted this Swedish classic. It is AMAZING!!!

If you have been to Sweden you most probably know what "kladdkaka" is. Even if you haven't been here but have Swedish friends you have probably tasted this Swedish classic. It is AMAZING!!!

For those you have not yet had the privilege of tasting this delicious "cake", here is the recipe...so get to your kitchen and try it out, because, yes...it IS so good. The closest that South Africans come to this is chocolate mud pie, which kind of explains what the "kladdkaka" is all about. Directly translated it means "sticky cake". And that's what it is. Sticky, gooey, chocolatey, amazing cake.

The number one secret with getting a perfect "kladdkaka" is not to mix the ingredients too much and not to have it in the oven for too long. It almost still needs to be jiggly in the middle when you take it out.

This "kladdkaka" is usually made in a round pie form, but I also like to make them as cupcakes. The one's in the pictures are topped with a nougat and raspberries. Absolute bliss!


Enough talking...here's the recipe:

Makes about 6-8 portions (if you are a chocolate lover like me, make that 2-4 portions ;-) )

2 eggs
1 cup (2 1/2 dl) sugar
4 tbsp cocoa
1 tsp vanilla essence
100g melted butter/margarine
100 ml (1 dl) flour
1 pinch of salt

1. Preheat the oven to 180 degrees C.
2. Mix the egg and sugar by hand for about 2 minutes.
3. Add the rest of the ingredients and fold then carefully in.
4. Pour the batter into an oiled pie form.
5. Bake for 15-20 minutes. Keep a close eye on your cake as each oven varies slightly in strength.
6. Serve either warm or cold, together with ice cream and cream.

Happy eating!

Love,
Heidi

Wednesday, 4 May 2011

Strawberry cheesecake cupcakes...

Phenomenal cupcakes...seriously. These things take cupcakes to a new level! In the middle of these delicious vanilla cakes lies the most delicious strawberry cheesecake filling, and to top it off...the most amazing white chocolate icing. That may seem like a pretty exaggerative explanation...but seriously, they ARE that good!

You have to try for yourself!


Makes 12 cupcakes:

(To see this recipe in Swedish, click here)

Vanilla cupcakes:

120 g melted butter or margarine
2 eggs
180g flour (about 400ml)
1 ¼ dl milk
140 g sugar (about ¾ cup)
1 pinch salt
2 tsp baking powder
1 tsp vanilla essence

Cheesecake filling:

100g cream cheese
1 egg
2 tbsp sugar
1 tsp vanilla essence
150 ml strawberry puré (made easily by blending half frozen strawberries)

1. Preheat the oven to 180 degrees. Put cupcake liners in a muffin tray, use 6 big ones or 12 normal sixed liners.
2. Mix all the ingredients for the cupcakes in a bowl.
3. In a separate bowl, mix all the ingredients for the cheesecake (except the strawberry) until smooth. Once smooth, add the strawberry puré and stir a few times.
4. Put some batter in the liners, then about 1 tbsp cheesecake filling, and top it off with some more cupcake batter, until the liners are about ¾ fill. The cheesecake filling is quite runny so some of it comes to the top, but that just adds to the marbled effect.
5. Bake in the middle of the oven for about 20-25 minutes. Let them cool completely.
6. Top with my favourite icing (you can find the recipe here) and some fresh strawberries.

Happy baking and delicious eating!

Love,
Heidi

Thursday, 28 April 2011

My favourite icing!

Today I made some DELICIOUS strawberry cheesecake cupcakes. They were SOOO good! I will share the recipe with you all in a few days, but to start with I will share my FAVOURITE frosting/icing recipe that I used to decorate the cupcakes with. I often use it when I make cakes as well...like this one. It is so tasty and the flavours are well balanced. Why don't you give it a try?

(För att se receptet på svenska titta lite längre ner på sidan)

White chocolate icing:

Enough to ice about 12 cupcakes

250 g white chocolate
340 g natural cream cheese
85 g butter
1 1/2 tbsp creme fraiche
1 tsp vanilla essence
1/2 dl icing sugar
food colouring (if needed)

1. Melt the chocolate carefully.

2. Mix the rest of the ingrediants in a blender very quickly. Add the chocolate and mix until combined.

3. Pour the icing into a bowl and put in the fridge for at least 1 hour.

4. Take out and mix with an electric beater until desired consistency.

Vitchoklad glasyr:

250g vitchoklad
340g mjukost
85g smör, rumstemperatur
1 1/2 msk creme fraiche
1 tsk vaniljsocker
1/2 dl florsocker

1. Smälta chokladen försiktigt

2. Lägg alla ingredienser (förutom chokladen) i en skål och mixar med en stavmixer. Blanda ner chokladen och mixar väl.

3. Låt vila i kylskåpet i minst 1 timme.

4. Mixar med elvisp till önskad konsistens.

Tuesday, 19 April 2011

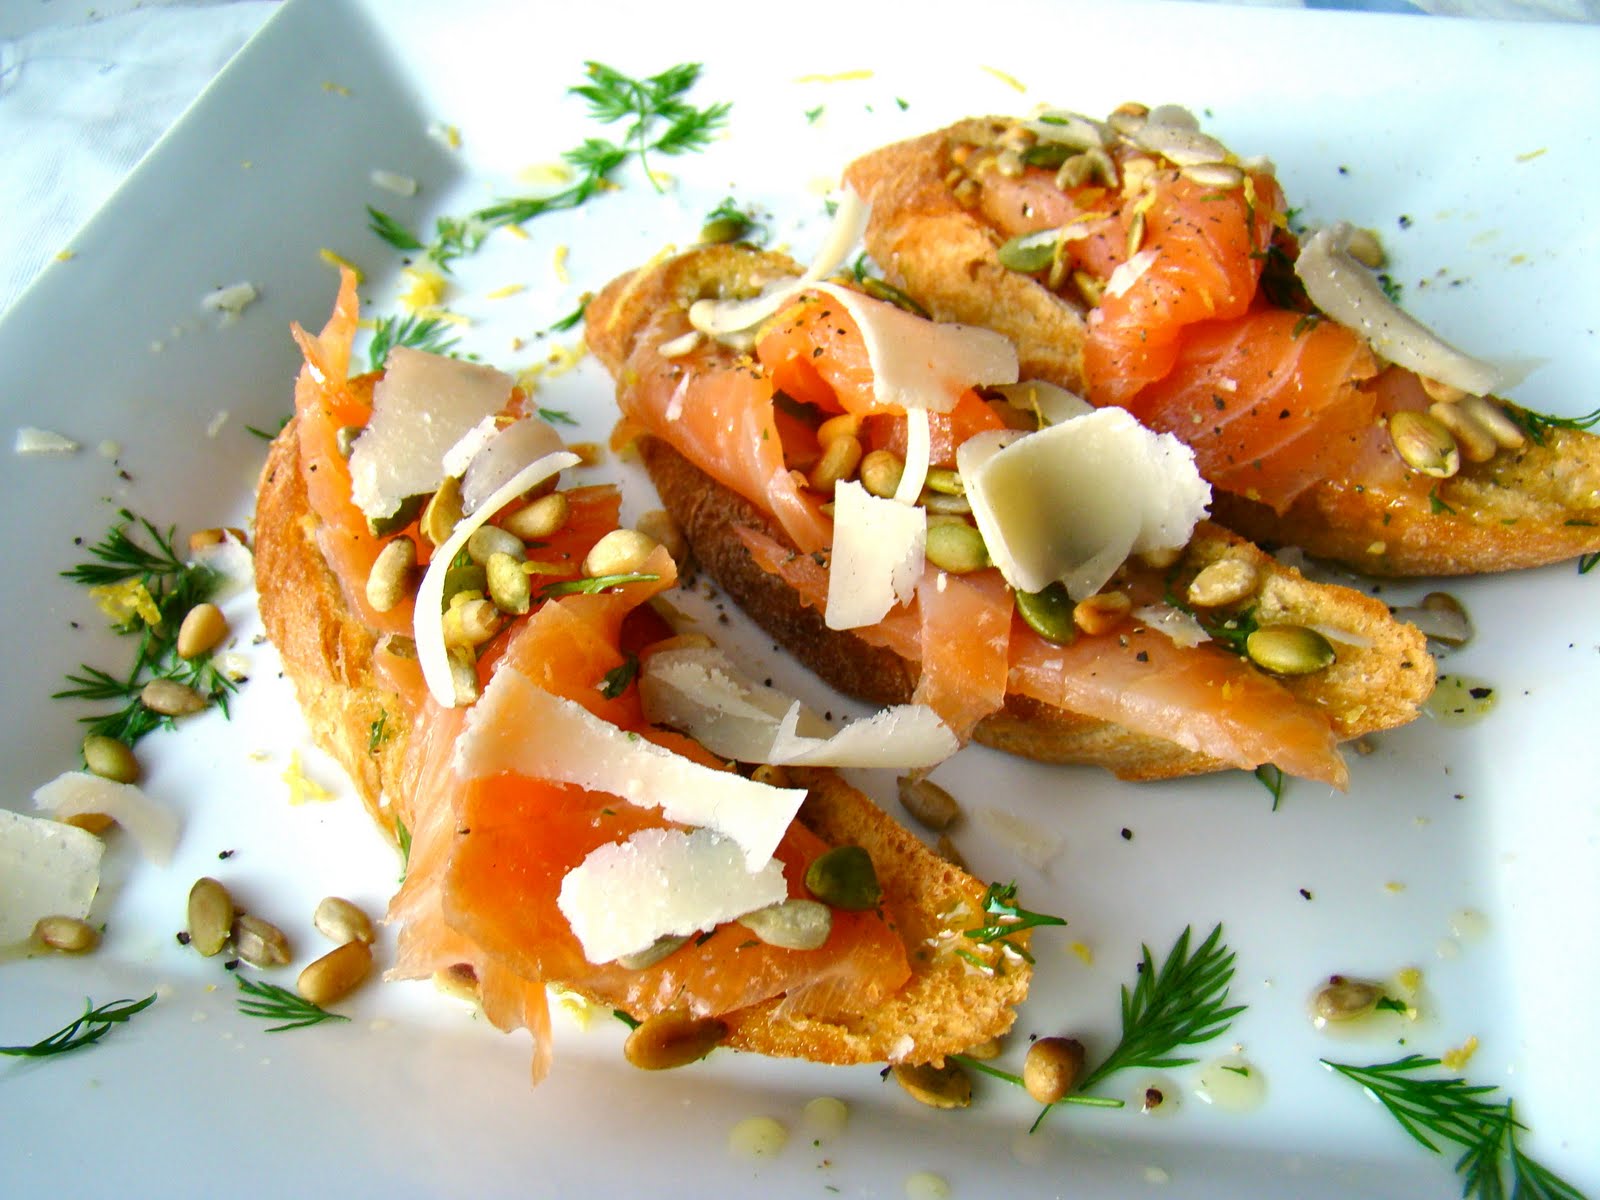
Smoked salmon bruschettas

This is my new favourite recipe...

Seriously!

It's delicious! And looks great! And is oh so simple to make!

There's a TV show in Sweden called "Halv åtta hos mig" (which basically means: Half past seven at my place), and even though we don't have a TV, I try to catch the show as often as I can on the internet. The show works like this: there are 4 contestants, who invite each other to their homes, for a 3-course meal. After each evening, the guests vote for their host and the host that gets the most points at the end, wins...simple as that! Anyways, I often think about what 3-course meal I would master up for my guests...

I at least have a good starter!

So why not try it out...I'll be there, half past seven at your place!


Makes about 12

To see this recipe in Swedish click here.

1 rustic baguette
150g smoked salmon, thinly sliced
1 small garlic clove
2 tbsp olive oil
1 dl (100ml) mixed seeds: pumpkin seeds, sunflower seeds, pine nuts...
Parmesan

Dill and lemon oil:
3 tbsp olive oil
1 tbsp finely chopped dill
1 tsp lemon zest
1 tbsp lemon juice
salt and pepper

This is how:

1. Put the oven on 200 degrees celcius.

2. Cut the baguette diagonally i 12 thick slices. Mix the crushed garlic and olive oil. Sprinkle over the bread and bake in the oven for about 15 minutes until the bread has hardened and become golden brown.

3. Roast the seeds in a dry pan.

4. Put the salmon on the bread, top with the seeds and some slices of parmesan.

5. Mix all the ingredients for the dill oil and sprinkle on top.

Wednesday, 13 April 2011

Delicious memories

I remember many years ago I had the opportunity to go with my family and some Dutch friends to a luxurious private game farm in South Africa. The excitement before the trip was insurmountable and rightly so.

It is an experience that I remember clearly...for several reasons: firstly, in my young and impressionable mind who hadn't experienced many of the luxuries of the world, the opportunity to stay in a luxury chalet with an amazing view, fantastic service and a private outdoor shower.

The other thing I remember was the private safaris that we had, with our very own private (and oh so handsome) game ranger. The safaris were full of many laughs and fun times together with my family, with cosy tea-times on top of hills with fantastic views. Another thing I remember from this trip was the beautiful animals that we saw, we got about 6 m away from a mommy cheetah with 4 cute little cubs and we went walking through the bushes tracking elephants and learning how to put a "bush-thinking" cap on.

Finally, one of the last things that have stayed with me from that trip was the delicious food that we got to feast on. It was on this trip that my passion for food really started awakening. It was on this trip that I tasted the most delicious soup of my life - Butternut and orange soup. Since then I have been on a mission to recreate this soup and I have finally gotten close enough to be able to share the recipe. Be prepared for the best soup of your life! Butternut is one of my favourite vegetables to use, as it has so much flavour. It isn't that common here in Sweden, but lately I've been able to find it at most of the big grocery stores. This is what a butternut looks like:


Butternut and orange soup:

(This recipe makes enough to feed many people)

To see this recipe in Swedish click here.


1 butternut
1 onion
2 garlic cloves
50g butter
1 celery stalk
½ red chilli, finely chopped
2 cups (5 dl) chicken (or vegetable) stock
½ orange, zest and juice
1 tsp ground nutmeg
1 pinch cinnamon
1 pinch white pepper
1 bay leaf
½ tsp curry
1 dl cream

1. Roughly chop the onion and celery. Sauté them lightly in the butter together with the crushed garlic and chilli in a big pot.
2. Peel the butternut and chop into large cubes. Put the butternut in the pot together with the stock, orange zest and juice and all the spices. Boil for about 30 minutes until the butternut is soft. Remove the bay leaf and blend until smooth.
3. Season with Salt and pepper. Stir in the cream just before serving.

I hope that you enjoy this soup! What is your favourite soup?

Have a great day!

Love,
Heidi

Monday, 28 February 2011

Banana and caramel pie

One of my favourite combinations in the world is banana and caramel. I don't know what it is about the flavours that are SOOO delicious, but mmmmm. Just thinking about it makes my mouth water. A while back, one of my recipes for the newspaper I write for was a delicious banana, caramel and chocolate pie!

You WANT to try this...believe me! Unless you are like my sister and don't like the flavour of bananas...then you won't like it. Otherwise it's a MUST ;-)

To see this recipe in Swedish, click here.


8 servings

3 1/2 dl flour (350 ml)
1 1/2 dl sugar (150 ml)
1 dl cocoa (100ml)
1 tsp bicarbonate of soda
1/2 tsp baking powder
1 pinch salt
60 g butter or margarine
1 dl sour cream (100ml)
2 bananas
2 dl cream, whipped
1 tin of caramel (if you live in a country where you can't buy ready-made caramel, or you feel adventurous and want to make your own, click here to see how.)

1. Preheat the oven to 180 degrees C.
2. Sift all the dry ingredients into a bowl.
3. Rub the butter and dry ingredients together with your finger tops.
4. Press the dough onto a sheet of wax paper into a ball, about 20 cm in diameter.
5. Bake in the middle of the oven for about 20 minutes. Cool of a cooling rack.
6. Spread the caramel over the pie base. Top with the sliced bananas and whipped cream.

(I made 2 pie bases so that I could make a sandwich-like dessert. If you want a more filling "fika"* then this is the way to go!)

Enjoy your day!

Love, Heidi

* Fika is a well-known Swedish term for having a coffee break together with something nice and sweet!

Wednesday, 26 January 2011

Dulché de Leché

Hello everyone

Today I'm going to share with you how to make Dulché de Leché. What is that, you may ask?

Well, it is this...


A delicious caramel that goes with almost anything! In many countries you can buy this caramel ready-made, but here in Sweden you can't. So if you want to taste this little piece of heaven, you have to make it yourself.

I use it often as a cake filling, on it's own or mixed together with some whipped cream. It goes especially well with chocolate and bananas...

So, how do you make it?

It's very simple...the only problem is that it takes quite some time...but, hey, good things come to those who wait...and this is definitely worth the wait ;-)

Buy 1 tin of condensed milk...


Put the closed can into a pot of water (yes, that's right...DO NOT open the can), put the lid on and let it boil for 3-4 hours, making sure that the pot doesn't boil dry. Top up with water when needed. The longer the caramel boils, the thicker it will get, so if you want a runny caramel (perfect as a sauce for ice-cream) only boil for about 2 hours. If, when you open the can, it is too firm and you would like the caramel a little more runny, all you have to do is mix in some milk or cream until you get the right consistency.


That's it...it's that easy!

Happy baking...and try not to eat all the caramel straight out of the can ;-)

Love,
Heidi

Monday, 10 January 2011

The world's best white chocolate chip cookies!

A few months ago I was at Subway with some friends. I love Subway because you get to choose whatever you want on your sub...delicous! But after that visit there is one more reason that I love Subway...their macadamia and white chocolate chip cookies. They are AMAZING! Perfectly chewy and yet crisp at the same time. Since I tasted them a while back, I have been wanting to try and make those perfect cookies at home.

After looking at different recipes and comparing ingredients I came up with a combination that gives the PERFECT cookies. The fantastic thing with these cookies is that you can make them into any flavour you want. White chocolate and macadamia nuts, dried cranberries, normal chocolate chip...the list goes on.

To see this recipe in Swedish click here.

White chocolate chip cookies Makes about 20


5 dl (2 cups) flour
½ tsp bicarbonate of soda
½ tsp salt
180g butter, melted
2½ dl (1 cup) brown sugar
1 dl (100ml) white sugar
1 egg + 1 egg yolk
2 tsp vanilla essence
2½ dl (1 cup) white chocolate chips (or a roughly chopped chocolate slab)

1. Preheat the oven to 165 degrees C
2. Mix the flour, bicarb and salt in a bowl.
3. In a separate bowl, mix the butter, brown sugar and white sugar well.
4. Add the egg and the yolk to the sugar mixture and combine well.
5. Add the dry ingrediants and mix. Be careful not to over-mix...only mix until the flour is just combined in.
6. Finally stir in the white chocolate chips, or whichever flavour you choose.
7. Form the dough into small balls (about 4 cm wide) and press lightly down onto a baking sheet that is lined with wax paper. Leave enough room between the cookies for them to spread out while in the oven.


8. Bake for about 15 minutes, until the sides of the cookies are light brown but the inside is still soft.


A Tip:
Definately use butter if you can instead of margarine...you get a much creamier and fuller flavour.


Happy baking!

Love,
Heidi

Wednesday, 15 December 2010

The world's best chocolate cake!


Chocolate is never bad...at least, that's what I try and tell myself;-). But everything in moderation is good, isn't it? Well, here's a recipe for one of my all-time favourite chocolate cake recipes. It takes me way back to memories from my high school days when we used to go visit one of my dear friends, Mel. Her family is from America and most times we were over there her dad had made the most delicious chocolate cake. This recipe is based on that cake...it's definately worth a try!

This recipe can be found in Swedish here.

12-15 people

Ingrediants:

- 1 1/4 dl (½ cup) oil
- 4 dl (1 ½ cups) sugar
- 1 tsp vanilla essence
- 3 eggs, separated
- 6 dl (2½ cups) flour
- 1½ dl (2/3 cup) cocoa
- 1½ tsp bicarbonate of soda
- 1 tsp salt
- 3½ dl (1 1/4 cup) cold water


Icing:
- 1 tin condensed milk
- 50 g butter, room tempertaure
- 2 dl cocoa
- 2½ dl (1 cup) icing sugar (you may need more if you think the icing is too runny)

Method:

1. Set the oven to 180 degrees celcius. Grease a round cake tin (+/- 25 cm) with some butter.
2. Mix the oil and 1 cup of the sugar.
3. Mix in the egg yolks, one at a time, mixing well after each one.
4. Sieve the flour, cocoa, bicarb and salt together in a bowl. Add the vanilla essence and mix.
5. Mix half of the dry ingredients together with the sugar and oil. Add the water and then finally the rest of the dry ingrediants. Mix well.
6. Beat the egg whites until they form hard peaks. Add the rest of the sugar and beat for a few more minutes.
7. Fold the whites carefully into the rest of the batter.
8. Pour the batter into the tin and bake for appr. 1 hour. Cool.
Icing:
1. Beat the butter (at room temp) with the condensed milk. Sieve the cocoa and icing sugar and mix it with the butter.
2. Pour over the cake and decorate with chopped pecan nuts and white chocolate.

YUMMY!

Have a lovely day!

Love,
Heidi

Sunday, 31 October 2010

Malva Pudding


One of my absolute favourite South African desserts is Malva Pudding. It is AMAZING! A soft and moist texture combined with a creamy, vanilla flavour makes this pudding almost irresistible. This dessert is on almost every South African restaurant menu and found deep in the memories of many true South Africans. This is a real comfort food that is perfect for these cosy autumn evenings and especially for those of us South Africans missing home!

This recipe can be found in Swedish here!


Malva Pudding: 6-8 servings:

•1 cup sugar
•2 tbsp margarine
•1 egg
•1 tbsp smooth apricot jam
•1 tsp white wine vinegar
•1 cup milk
•1 cup flour
•1 tsp bicarbonate of soda
•1 tsp baking powder
•½ tsp salt
For the sauce:
•½ cup cream
•125 g margarine
•½ cup sugar
•1/3 cup water
•1 tsp vanilla essence
Method:
1.Put the oven on 180 degrees (Celsius)
To make the pudding:
2.Beat the margarine and sugar well.
3.Add the egg, apricot jam and vinegar while beating.
4.Mix in the milk first and then add the flour, baking powder, bicarbonate and salt, mixing until everything is just blended.
5.Pour the batter into individual ramekins. Cover the forms with foil and bake for 40 minutes.

To make the sauce:

6.Melt the margarine with the sugar and water on a stove.
7.Remove from the heat and add the cream and vanilla essence.
8.Pour the sauce over the pudding as soon as it is out of the oven. It may feel like too much sauce, so go on your feeling, but don’t be scared about pouring over too much sauce…this is what makes the pudding so mice and moist.
9.Enjoy served with some vanilla custard or ice-cream.

If you don’t have individual ramekins, the recipe will work just as well when baked in a larger oven proof dish. Just remember to increase the time spent in the oven up to around an hour.
 
Blog Template by Delicious Design Studio